HowTo Install RHEVH VMware Workstation Home Lab Setup – Part-4
Most of the interested Administrators/Learners would like to practice at home using there own high configuration Workstations/Computers. Already virtualized environment do you want again enable for virtualization.? is it possible to do so, i say yes we can still do an virtualized virtual machine can be virtualized for installing RHEVH/Hyper-V/VMware ESX/ESXi. Using same method we are going to install RHEVH VMware Workstation Home Lab Setup This is the Part-4 in series of RHEV Tutorial
- What is Red Hat Enterprise Virtualization
- Installation of RHEVM step by step guide
- RHEVH4.1 Installation Guide
- Red Hat Enterprise Hypervisor Installation
Install RHEVH VMware Workstation Home Lab Setup
Very first step is to create Virtual machine using VMware workstation 10.x/11.x/12.x Let’s follow the steps to create Virtual Machine. Installation of VMware Workstation
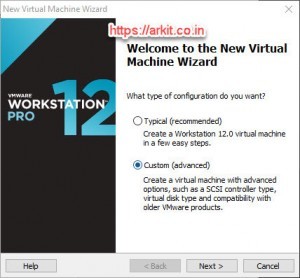
To Create a Virtual Machine Click on File –> New Virtual Machine
Custom Installation required
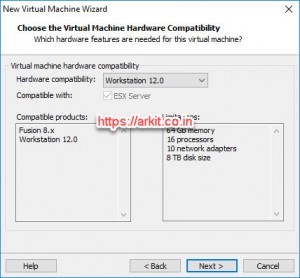
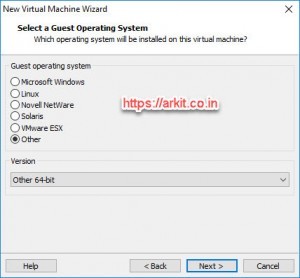
Here Click Next (Next Screen),
Provide your Virtual Machine and provide the path to store Virtual Disk Click Next
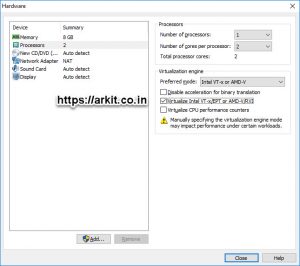
Processor Configuration Select Appropriate Numbers and Click Next
Memory For the Virtual Machine 8GB is Recommended Click Next
Network Type (Preferable is NAT) Click Next
Select I/O Controller Type LSI Logic is Recommended Click Next
Disk type Selection Window Select IDE, Other than IDE can’t be supported for RHEVH Installation in VMware Workstation Click Next In Continuation Select Create New Virtual Machine Disk and Next Screen Provide 100GB of Size for Machine Disk
Verify the Disk Path and Click Next and Click Finish
Note: Do not Power On the Machine
Right Click on Virtual Machine –> Click on Settings –> Click on Processor
Now Edit .vmx file in notepad which is created the path you stored the Virtual Disk
Add below strings to last of the file
hypervisor.cpuid.v0 = “FALSE”
mce.enable = “TRUE”
vhu.enable = “TRUE”
Power on Virtual Machine and Start Installing RHEVH VMware WorkStation
Conclusion
Enabling VT is only the key point here when you want to run any type of virtualization
Thanks for your wonderful Support and Encouragement
- Get Email | Download E-Books
- Facebook Page
- Youtube Channel
- Exclusive Telegram Group
- Discuss On WhatsApp Group


