How to replace the Node Canister In IBM V7000 Storage Ultimate Guide
Are you an beginner in SAN administer, Here we are giving you an good article how to replace the node canister in IBM V7000 Storage Ultimate Guide. Ofcourse if we directly talk about canister replacement then you may miss the link what it is exactly. Canister is nothing but controller in other SAN terminology. If you take a example of NetApp Storage the main Filer / Controller in IBM SAN they call it as Canister.
Brief description of Node Canister
The heart of IBM Storwize V7000 system is a pair of node canisters. These two node canisters share the data transmitting and receiving load between the attached hosts and the disk arrays. This section examines the RAS features of IBM Storwize V7000 system, monitoring, and troubleshooting.
These two node canisters are in the control enclosure and they work as a clustered system.
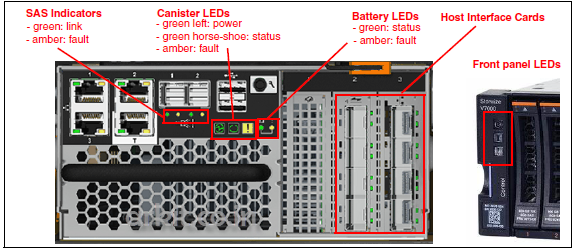
the below Figure shows the ports and the indicator lights of a node canister. Rear canister LED’s are identical with front panel LED’s. The second canister is placed next to the first one in a side-by-side position.
How to replace the Node Canister in IBM V7000 Storage
Before doing anything we should carefully verify, there is no I/O operations are going on. If the V7000 Storage system is powered on and performing the I/O operations, then go to the management GUI and follow the fix procedures. Before Performing the replacement actions without any assistance of fix procedures can result in loss of data or access to data.
We have to be careful that when we are replacing the hardware components that are located in the back of the system that we do not inadvertently disturb or remove any cables that you are not instructed to remove.
Attention: We are not supposed to replace one type of node canister with another type of node canister. For e.g.,, In Storage do not replace a model 2076-112 node canister with a model 2076-312 node canister.
We have to be aware the following canister LED states:
- If both the power LED and system status LED are in on, do not remove a node canister unless it is directed to do so by a service provider.
- If the system status is off and it is acceptable to remove a node canister. However, we do not remove a node canister unless directed to do so by a service provider.
- If the power LED is flashing or off, it is safe to remove a node canister. However, do not remove a node canister unless directed to do so by a service provider.
Attention: Even if the node canister is in powered off state, it is still possible to lose data. So, do not remove a node canister unless directed to do so by a service procedure.
To replacing the node canister, perform the below following steps:
Procedure:
- Before you begin First, read the safety precautions in the IBM Storwize V7000 Safety Notices. These guidelines help you safely work with the Storwize V7000.
- Confirm that you have to know which canister has to replace.
- Identify and Record which data cables are plugged into the specific ports of the node canister.
- The old cables must be inserted back into the same ports which are connected earlier after the replacement is complete; otherwise, the system cannot function properly.
- Disconnect the data cables for each node canister
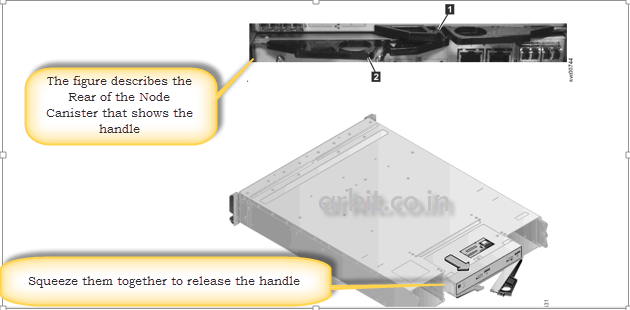
- Grasp the handle between the thumb and forefinger.
- From the V7000 Node canister slot pull out the handle to its full extension.
- Grip the node canister and pull it out.
- Insert the new node canister into the slot with the handle pointing towards the center of the slot and insert the unit in the same orientation as the one that you removed.
- Push the node canister back into the slot until the handle starts to move it.
- After finish inserting the node canister into the slot by closing the handle until the locking catch clicks into place.
- If the V7000 enclosure is powered on, then the canister starts automatically.
- After that Reattach the data cables.
Note: Ensure that you are opening the correct handle. The handle locations for the node canisters and expansion canisters are slightly different.
The handles for the node canisters are located in close proximity to each other. replace the Node Canister In IBM V7000
The handle with the finger grip on the right removes the upper canister (1). and the handle with the finger grip the left removes the lower canister (2).
Disclaimer: The above topic is practiced in the our Lab environment we are not responsible if you failed in replacing the node canister. with the help of service provider make sure to replace the node canister in production environment. replace the Node Canister In IBM V7000
Relate Articles
IBM V7000 Volume Types Explained
How to Manage Bitmap Space Configuration IBM V7000
Overview of IBM DS4700 SAN Storage
Thanks for your wonderful Support and Encouragement
- Get Email | Download E-Books
- Facebook Page
- Youtube Channel
- Exclusive Telegram Group
- Discuss On WhatsApp Group


