Secure web Server using SSL certification in RHEL 7
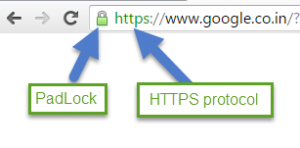
Installing and configuring Secure web Server in RHEL 7. SSL Certificates are small data files that digitally bind a cryptographic key to an organization’s details. When we installed an web server with SSL (Secure Socket Later) certificate it shows an padlock in starting of the address bar and HTTPS protocol. As shown in the below figure.
For an standard SSL it will not show an PadLock but it will show an https protocol.
How SSL certificate provides more security to website
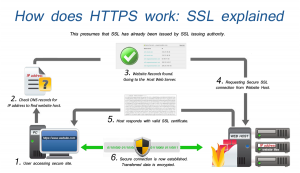
- A browser attempts to connect a web site secured with SSL. The browser requests that the we server identify itself.
- There are two types of keys will be placed in server one is public key, Second one is private key. Public key of copy will be installed with the browser installation itself because most of CA (Certification authorities) will be listed in web browsers. When client request for an web page request first reach to DNS server it will verify the IP address details then transfer the request to Web server web server will send an SSL certificate (Public key token) client launches with HTTPS website.
- Now server and client data will be encrypted with 2048 bit
If you would like to see an listed Certificate authorities in Google chrome Settings → Show Advanced Settings → HTTPS/SSL → Manage Certificates (Screenshot is shown below)
 Above listed certificates are pre-loaded when you install an browser
Now Let’s Go back our real installation and configuration of Secure web server using SSL certification in RHEL 7
First install an http packages
# yum install http*
# systemctl enable httpd.service
# systemctl start httpd.service
# systemctl status httpd.service
Now create an sample html file in default web location /var/www/html/ directory
# vim /var/www/html/index.html
<h1>Secure Site</h1>
</h2> Secure Site is Opened </h2>
:wq (Save & Exit)
Permit Firewall to connect web server from client
# firewall-cmd --permanent --add-service=https
# firewall-cmd --reload
In RHEL 7 we can mention directly the service name which will automatically enables the appropriate port number in the backend
This is purely demo purpose only (Generating an SSL Certificate)
# openssl req -x509 -nodes -days 365 -newkey rsa:2048 -keyout /etc/pki/tls/private/apache.key -out /etc/pki/tls/certs/apache.crt
Generating a 2048 bit RSA private key

Country Name (2 letter code) [XX]:IN
State or Province Name (full name) []:Telangana
Locality Name (eg, city) [Default City]:Hyderabad
Organization Name (eg, company) [Default Company Ltd]:ArkIT
Organizational Unit Name (eg, section) []:IT
Common Name (eg, your name or your server's hostname) []:TechTutorial.arkit.com
Email Address []:
After you enter the request, you will be taken to a prompt where you can enter information about your website. Before we go over that, let’s take a look at what is happening in the command we are issuing:
- openssl: This is the basic command line tool for creating and managing OpenSSL certificates, keys, and other files.
- req -x509: This specifies that we want to use X.509 certificate signing request (CSR) management. The “X.509” is a public key infrastructure standard that SSL and TLS adhere to for key and certificate management.
- -nodes: This tells OpenSSL to skip the option to secure our certificate with a passphrase. We need Apache to be able to read the file, without user intervention, when the server starts up. A passphrase would prevent this from happening, since we would have to enter it after every restart.
- -days 365: This option sets the length of time that the certificate will be considered valid. We set it for one year here.
- -newkey rsa:2048: This specifies that we want to generate a new certificate and a new key at the same time. We did not create the key that is required to sign the certificate in a previous step, so we need to create it along with the certificate. The rsa:2048 portion tells it to make an RSA key that is 2048 bits long.
- -keyout: This line tells OpenSSL where to place the generated private key file that we are creating.
- -out: This tells OpenSSL where to place the certificate that we are creating.
Fill out the prompts appropriately. The most important line is the one that requests the Common Name. You need to enter the domain name that you want to be associated with your server. You can enter the public IP address instead if you do not have a domain name.
Secure web Server using SSL certification in RHEL 7
Ensure that file are generate and kept under the below directory path
/etc/pki/tls/certs/
Now Copy the ssl.conf file from /etc/httpd/conf.d/ssl.conf to any temp location (Example /tmp) then edit the file.
# cp /etc/httpd/conf.d/ssl.conf /opt/
in Default ssl.conf file delete lines from 1 to 69 until ‘SSLEngine on‘ Key word appears
below is the final configuration file for configuring the SSL certificate
# vim /etc/httpd/conf.d/arkit.conf
<VirtualHost *:443>
 ServerAdmin root@localhost
 ServerName TechTutorial.arkit.com
 DocumentRoot /var/www/html
SSLEngine on
SSLProtocol all -SSLv2
SSLCipherSuite HIGH:MEDIUM:!aNULL:!MD5
SSLHonorCipherOrder on
SSLCertificateFile /etc/pki/tls/certs/arkit.com.crt
SSLCertificateKeyFile /etc/pki/tls/private/arkit.com.key
SSLCertificateChainFile /etc/pki/tls/certs/arkit.com.csr
</VirtualHost>
:wq (Save & Exit)
Restart the web service (http.service) to reflect the changes
Client Side
Browse the website which should load with https://arkit.co.in
That’s it. you successfully configure secure web server with SSL certificate in RHEL 7 / Centos 7
Please do provide your valuable feedback on the same
SEO Keywords: secure web Server, What is Web Server, Web Server Installation and configuration, HTTP Service Enable.
Related Articles
Thanks for your wonderful Support and Encouragement
- Get Email | Download E-Books
- Facebook Page
- Youtube Channel
- Exclusive Telegram Group
- Discuss On WhatsApp Group


Thanks To you share information like deep knowledge.
thanks Mukesh. Stay tune.
How to Work on Local Machine , I am Using VMware , My Hostname is localhost??
Thanks
From where did you get the csr file in /etc/pki/tls/certs/arkit.com.csr ?
You can simply comment that config line and try OR generate using below command
openssl req -new -newkey rsa:2048 -nodes -keyout arkit.com.key -out arkit.com.csr
Thanks…boss
Can you help me configure two way ssl ?
What you mean by two way SSL.?
Hi this is nagaraj from bangalore I ve gone through most of ur Linux URLs it is very gud. But I am still confuse about my self is it compulsory to go for institute and learn rhce course. Pls help me out.
As I don’t ve 64bit desktop machine. And is it mandatory to buy gud configuration machine and try to learn in home or going to institute and learn. Pls suggest in helping me.
if you have good configuration computer /work station at your home do practice multiple times (each 21 times) then you will never forgot and does required any training. If your completely fresher do not know anything follow few youtube channels and learn. If still not they prefer institute either online courses.