NagVis Installation CentOS 8 Step by Step Guide | ArkIT
NagVis is a visualization tool. You can create great visualized maps using nagvis software, along with Nagios monitoring tool or icigna you can use it. NagVis Installation CentOS 8 step by step guide for you in this article.
- Display of single Hosts and Services
- Visualize a complete Host- or Service-group with one icon
- Display the summary state of a Host and all its services
- Display only the real problems
- Sub-map icons which represent a complete NagVis Map in one icon (drill down)
- Visualization of complete IT processes using self drawn graphics
- Online documentation of IT environments including current states
- Visualization of network traffic using weather-map lines
- Multilingual capabilities
- Web based configuration of your maps
Install dependent packages
# yum install php php-pdo php-pdo_mysql php-fpm php-json rsync gcc g++ php-mbstring php-mysqlnd php-gd php-xml
By default CentOS will help CentOS repositories, however if you want more packages install EPEL rpm for EPEL repository. after installing dependency packages, now download NagVis tar package from http://www.nagvis.org/ site.
# wget http://www.nagvis.org/share/nagvis-1.9.18.tar.gz
# tar -xvf nagvis-1.9.18.tar.gz
# cd nagvis-1.9.18
# ./install.sh
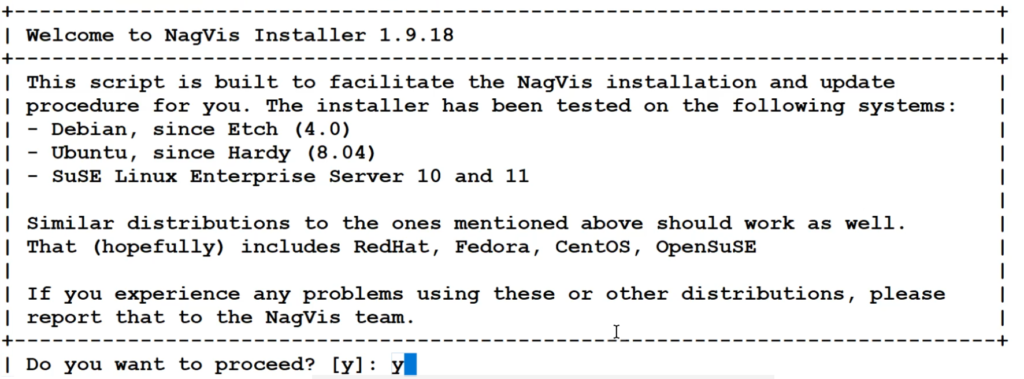
It will ask for confirmation before continue
Start NagVis Installation
confirm by typing ‘y’ or Hit Enter key
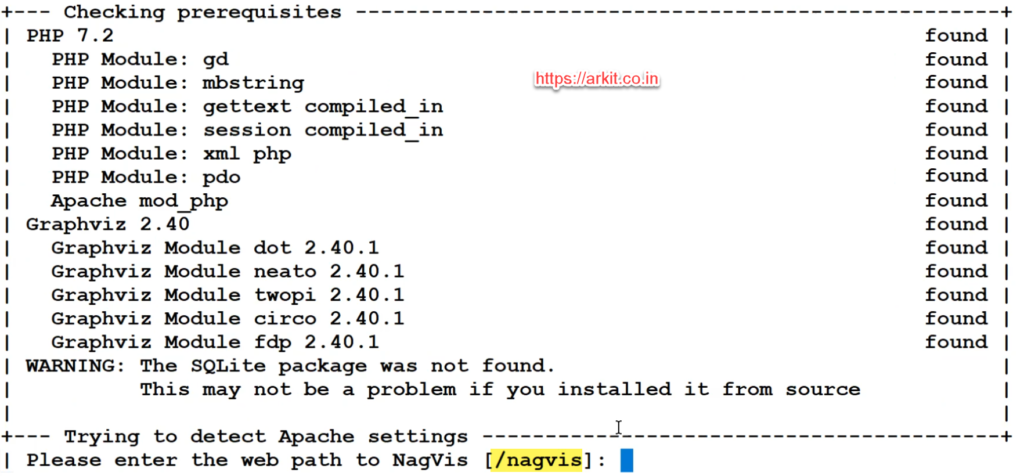
Provide Nagios installed path and also NagVis installation path
Please enter the web path to NagVis [/nagvis]:
Please enter the name of the web-server user [apache]:
Please enter the name of the web-server group [apache]
create Apache config file [y]:
Provide appropriate details and say yes hit enter
NagVis home will be : /usr/local/nagvis
Owner of NagVis files will be: apache
Group of NagVis files will be: apache
Path to Apache config dir is : /etc/httpd/conf.d
Apache config will be created: yes
Installation mode: install
Do you really want to continue? [y]: y
Installation completed.
Username: admin
Password: admin
Now restart Web server services and Nagios service to take effect
# systemctl restart httpd
# systemctl restart nagios
Access the NagVis http://IP-ADDRESS/nagvis
That’s it. Successfully installed NagVis Visualization software. To configure maps you need to install either ndoutilities, mklivestatus, pgsql or other status data
Related Articles
Nagios Certified Professional Course
Thanks for your wonderful Support and Encouragement
- Get Email | Download E-Books
- Facebook Page
- Youtube Channel
- Exclusive Telegram Group
- Discuss On WhatsApp Group


I did installation by ./install.sh but I can’t access nagvis to Redhat 8.
But present 403 error
Forbidden
You don’t have permission to access this resource.
Error log httpd:
[Wed Jan 19 14:07:10.085106 2022] [authz_core:error] [pid 1176149:tid 140031888971520] [client 192.168.22.45:62262] AH01630: client denied by server configuration: /nagvis/nagvis/share/frontend/nagvis-js/index.php
My httpd conf looks like this:
Alias /nagvis/ “/nagvis/nagvis/share/”
Options FollowSymLinks
AllowOverride none
#Order allow,deny
#Allow from all
Require all granted
# Apache >= 2.4
Require all granted
# Apache < 2.4
Order allow,deny
Allow from all
# To enable Nagios basic auth on NagVis use the following options
# Just uncomment it. Maybe you need to adjust the path to the
# Auth user file.
#
# If you use the NagVis internal auth mechanism based on the web
# for you won’t need this.
#
#AuthName “NagVis Access”
#AuthType Basic
#AuthUserFile /nagios/etc/htpasswd.users
#Require valid-user
# With installed and enabled mod_rewrite there are several redirections
# available to fix deprecated and/or wrong urls. None of those rules is
# mandatory to get NagVis working.
RewriteEngine On
RewriteBase /nagvis/nagvis
# Use mod_rewrite for old url redirection even if there are php files which
# redirect the queries itselfs. In some cases the mod_rewrite redirect
# is better than the php redirect.
#
# Using the php redirect seems to be better in some cases where https/http servers
# are mixed. For example in OMD setups where using apache own mode and https in the
# frontend and http in the backend apache servers.
#
# Disabling this redirect by default in the hope that the php direct works better.
#RewriteCond %{REQUEST_URI} ^/nagvis/nagvis(/config\.php|/index\.php|/|)(\?.*|)$
#RewriteRule ^(.*)$ /nagvis/nagvis/frontend/nagvis-js/%1%2 [R=301,L]
# Redirect old regular map links
RewriteCond %{REQUEST_URI} ^/nagvis/nagvis/frontend/(wui|nagvis-js)
RewriteCond %{QUERY_STRING} map=(.*)
RewriteRule ^(.*)$ /nagvis/nagvis/frontend/nagvis-js/index.php?mod=Map&act=view&show=%1 [R=301,L]
# Without map= param
RewriteCond %{REQUEST_URI} ^/nagvis/nagvis/frontend(/wui)?/?(index.php)?$
RewriteRule ^(.*)$ /nagvis/nagvis/frontend/nagvis-js/index.php [R=301,L]
# Redirect old rotation calls
RewriteCond %{REQUEST_URI} ^/nagvis/nagvis/frontend/nagvis-js
RewriteCond %{QUERY_STRING} !mod
RewriteCond %{QUERY_STRING} rotation=(.*)
RewriteRule ^(.*)$ /nagvis/nagvis/frontend/nagvis-js/index.php?mod=Rotation&act=view&show=%1 [R=301,L]
I did installation by ./install.sh but I can’t access nagvis to Redhat 8.
But present 500 error httpd server.