Cloudera Distribution Apache Hadoop 5.14.x Manual Installation – CDH
Now a days data science and big data analytics market is going like too fast and data scientist engineers are earning highest salaries in industry. Do you want get started with learning big data analytic. Here is the article which gives you to setup your own big data lab for practice. In this case we are using CDH = Cloudera Distribution Apache Hadoop 5.14.x Version.
Why CDH – Cloudera Distribution Apache Hadoop
You can also setup an environment without using CDH but it is going to be an 8 to 10 hours of job to setup all the required applications like Apache Hadoop, Hive, Hue, Spark, R Language and Pig so many tools. Cloudera will give you an robostic method to deploy your environment in an hour of time.
Big Data environment resources
- Operating System: Centos 7.4 / RHEL 7.4
- RAM Minimum 8GB
- HDD Space Minimum 60GB
- Processor Cores 2 per each machine
Lab We are using in this installation is 4 Nodes one is master and remaining 3 machines are nodes.
Install Operating System in all machines Video Guide
Preparing Machines for CDH 5.14.x Installation
1. Disable Transparent Huge Page
# echo never > /sys/kernel/mm/redhat_transparent_hugepage/enabled
# echo never > /sys/kernel/mm/redhat_transparent_hugepage/defrag

Add the same lines in /etc/rc.local file

# vi /etc/default/grub
GRUB_CMDLINE_LINUX="transparent_hugepage=never" ##--Update this line
# grub2-mkconfig -o /boot/grub2/grub.cfg
2. Change VM Swappiness
Open a file /etc/sysctl.conf and add
# vi /etc/sysctl.conf

vm.swappiness=10
Verify the same by listing contents of file /proc/sys/vm/swappiness
Note: Reboot is required to effect this settings
3. Disable Firewall and iptables services
--In RHEL 7
systemctl stop firewalld/iptables/ip6tables
systemctl disable firewalld/iptables/ip6tables
-- RHEL 6
service stop iptables
service stop ip6tables
--RHEL 6
chkconfig iptables off
chkconfig ip6tables off
4. Disable SELinux
Edit file /etc/selinux/config
vi /etc/selinux/config

SELINUX=disabled
Note: Reboot is required to take effect
5. Assign Hostname to All Nodes including Master node
Edit config file and write host name
# vi  /etc/sysconfig/network
HOSTNAME=cdh-master.local
Or
# hostnamectl set-hostname arkit-server --static
Update internal host list to ping using host and resolve IP address of other nodes
Write in /etc/hosts file with your hosts IP addresses & names
192.168.1.5 cdh-master.local master
192.168.1.6 cdh-node1.local node1
192.168.1.7 cdh-node2.local node2
192.168.1.8 cdh-node3.local node3
6. Install NTP packages and sync time with NTP server
# yum -y install ntp
# service ntpd start
# chkconfig ntpd on
–in RHEL 7
# systemctl start ntpd
# systemctl enable ntpd
Edit /etc/ntp.conf file and add NTP server address
7. Create Users and Groups
# groupadd hadoop

# useradd -g hadoop hadoop
Create hadoop user and join the user to hadoop group
8. Create SSH Key and create passwordless connection with all nodes
# ssh-keygen -t rsa

# ssh-copy-id node1

root@node1's password:
Repeat above step for all nodes
Preparing CDH -Cloudera Distribution Apache Hadoop Master Node
We have to install apache (Web Server) master node in order to deliver packages to nodes
# yum install -y httpd*
# systemctl start httpd.service
# systemctl enable httpd.service
Now let’s download the tarball package from cloudera site
# cd /var/www/html/
# wget http://archive.cloudera.com/cm5/repo-as-tarball/5.14.0/cm5.14.0-centos7.tar.gz
# tar -xvf cm5.14.0-centos7.tar.gz
Create YUM repository using this web server path
9. Create Yum Repo configuration
# vi /etc/yum.repos.d/cloudera.repo

[Techarkit]
name=Cloudera Distribution Apache Hadoop Repository
baseurl=http://cdh-master.local/cm/5.14.0/
gpgcheck=0
Do the same yum repo configuration in ann nodes
Install Cloudera Manager Server and Agent Packages
# yum install cloudera-manager-agent.x86_64 cloudera-manager-server cloudera-manager-daemons.x86_64 oracle-j2sdk1.7.x86_64 enterprise-debuginfo.x86_64
Set Java_home path to recognize java installation
# vi /etc/default/cloudera-scm-server
export JAVA_HOME=/usr/java/jdk1.7.0_67-cloudera/
Prepare database for SCM in this scenario i am using Mariadb as custom database
# yum install -y mariadb* mariadb-connector-java
# systemctl start mariadb
# systemctl enable mariadb

-- run the Script to secure MySQL Access
/usr/bin/mysql_secure_installation

# mysql -u root -predhat
mysql> create user 'aravi'@'%' identified by 'mysql' ;
Query OK, 0 rows affected (0.00 sec)

mysql> grant all privileges on *.* to 'aravi'@'%' with grant option ;
Query OK, 0 rows affected (0.00 sec)

--Initialize MySQL Database
[root@HYD-CDH-MASTER ~]# /usr/share/cmf/schema/scm_prepare_database.sh mysql -h localhost -u aravi -pmysql --scm-host cdh-master.local cdhscm aravi mysql

--After initialization verify database and its tables
mysql> show databases;
+--------------------+
| Database |
+--------------------+
| information_schema |
| mysql |
| cdhscm |
+--------------------+
3 rows in set (0.00 sec)

mysql> use cdhscm;
Database changed
mysql> show tables;
Empty set (0.00 sec)
Start Cloudera services
Now start cloudera agent and server services in master node
# service cloudera-scm-agent start
# chkconfig cloudera-scm-agent on

# service cloudera-scm-server start
# chkconfig cloudera-scm-server on
Install required packages in all nodes
# yum install cloudera-manager-agent.x86_64 cloudera-manager-daemons.x86_64 oracle-j2sdk1.7.x86_64 enterprise-debuginfo.x86_64
Add CM Server Address in Agent configuration File
# vi /etc/cloudera-scm-agent/config.ini
# Hostname of the CM server.
server_host=cdh-master.local
JAVA_HOME path
# vi /etc/default/cloudera-scm-agent
export JAVA_HOME=/usr/java/jdk1.7.0_67-cloudera/
also install mariadb packages and start services. Later use to deploy databases for hive,hue,report manager, Oozie and task tracker
Start agent service in all the nodes
# service cloudera-scm-agent start
# chkconfig cloudera-scm-agent on
Up to here Done with Master and agent configuration Now login to cloudera Manager
http://cdh-master.local:7180/cmf/login
Default cloudera manager user name and password
- User Name: admin
- Password: admin
Download CDH Parcels
Keep parcel download in master server
# cd /var/www/html/parcels/
# wget http://archive.cloudera.com/cdh5/parcels/5.14.0/CDH-5.14.0-1.cdh5.14.0.p0.24-el7.parcel
# wget http://archive.cloudera.com/cdh5/parcels/5.14.0/manifest.json
Welcome to cloudera Manager
Tick Mark: Yes i accept the End User License terms and conditions
Click Continue
Selec the Edition which you want to use for deployment
- Cloudera Express Version
- Enterprise Trail
- Cloudera Enterprise
Continue (2)
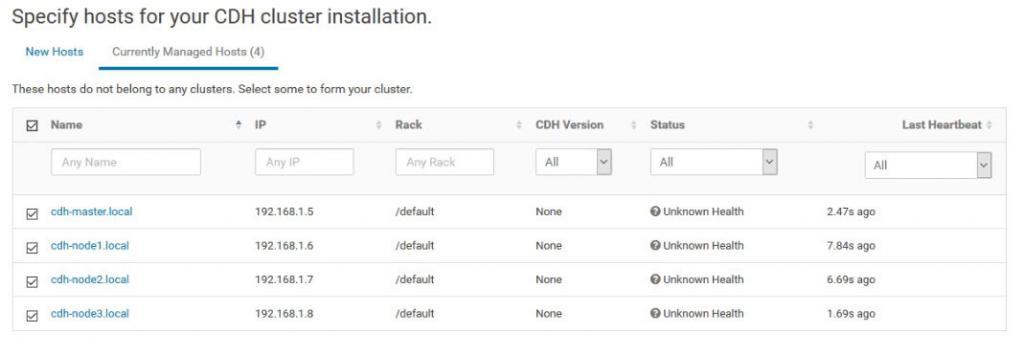
Select the nodes which you want to use in this cluster
[root@cdh-master parcel]# mysql -u aravi -p
Enter password:
Welcome to the MariaDB monitor. Commands end with ; or \g.
Your MariaDB connection id is 383
Server version: 5.5.56-MariaDB MariaDB Server

Copyright (c) 2000, 2017, Oracle, MariaDB Corporation Ab and others.

Type 'help;' or '\h' for help. Type '\c' to clear the current input statement.

MariaDB [(none)]> create database hive;
-- Create all databases
MariaDB [(none)]> exit
Bye
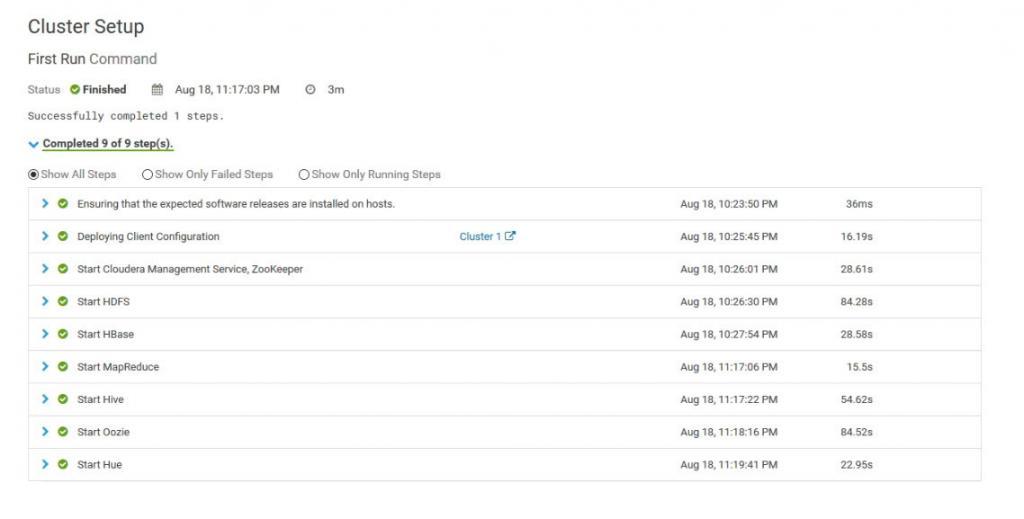
See the roles an each node
That’s about installing and configuring CDH – Cloudera Distributed Apache Hadoop 5.14.x Manual installation process to deploy cluster environment. Good luck.
Bigdata Environment setup for Data Scientist practice lab
Download RPM’s including dependencies
How To Install R Studio in RHEL 7
Thanks for your wonderful Support and Encouragement
- Get Email | Download E-Books
- Facebook Page
- Youtube Channel
- Exclusive Telegram Group
- Discuss On WhatsApp Group


thank you. your article is very helpful
Thanks