PXE Boot server configuration step by step Guide
Preboot execution Environment (PXE Boot, sometimes pronounced as pixie) specification describes a standardized client-server environment that boots a software assembly, retrieved from a network, on PXE-enabled clients. On the client side it requires only a PXE-capable network interface controller (NIC), and uses a small set of industry-standard network protocols such as DHCP and TFTP.
The concept behind the PXE originated in the early days of protocols like BOOTP/DHCP/TFTP, and as of 2015 it forms part of the Unified Extensible Firmware Interface (UEFI) standard. Given fast and reliable local area networks (LANs), PXE is the most frequent choice for operating system booting, installation and deployment.
Assume if there is no PXE Boot server we have to have more OS CD/DVD’s to install multiple clients and require manual intervention to configure partitions, software packages users creation so an.
PXE Boot is very useful when we looking to re-image / install more clients yet a time.
Server OS – RHEL 7 / Centos 7
Note: Observe carefully and do not miss even single character of config files, which may result un-successful PXE Boot Server.
PXE Boot Advantages :
- No need to carry Installation media all the times
- Less manual intervention required
- No need to monitor installation process
Let’s see the procedure how to configure PXE Boot server
Step 1: Assign static IP address to PXE Boot Server
using below command we can assign static IP address to server in RHEL7 / Centos 7
[root@Ark-PXEBootServer ~]# nmcli connection modify eno16777736 ipv4.addresses 192.168.4.13/24 ipv4.gateway 192.168.4.2 ipv4.dns 192.168.4.12 ipv4.method manual connection.autoconnect yes
Bring down and bring up interface connection to reflect changes OR restart network service systemctl restart network.service
[root@Ark-PXEBootServer ~]# nmcli connection show
NAME UUID TYPE DEVICE
eno16777736 c3d606c9-1e71-4c62-8280-7b2380d11b97 802-3-ethernet eno16777736

[root@Ark-PXEBootServer ~]# nmcli connection down eno16777736
[root@Ark-PXEBootServer ~]# ip a
Step 2: Install FTP server and copy OS CD / DVD content to FTP path
mount the installation media to your server and copy the total content to FTP path
[root@Ark-PXEBootServer ~]# mount /dev/sr0 /run/media/root/
[root@Ark-PXEBootServer ~]# rpm -ivh /run/media/root/RHEL-7.1\ Server.x86_64/Packages/vsftpd-3.0.2-9.el7.x86_64.rpm

[root@Ark-PXEBootServer ~]# cd /run/media/root/RHEL-7.1\ Server.x86_64/
[root@Ark-PXEBootServer ~]# cp -Rvf * /var/ftp/pub/

Now create an YUM server using copied packages

[root@Ark-PXEBootServer ~]# cd /etc/yum.repos.d/
[root@Ark-PXEBootServer ~]# vim localyum.repo
[localyum]
name=local yum server
baseurl=file:///var/ftp/pub/
enable=1
gpgcheck=0

:wq  (Save & Exit)
[root@Ark-PXEBootServer ~]# cd /var/ftp/pub/repodata/
[root@Ark-PXEBootServer ~]# cp 527a8b3063d516bd9d4cf33ebf5f8c5a0e83fecb48babbb9e84c7c573004b3f4-comps-Server.x86_64.xml /var/ftp/pub/comps-Server.x86_64.xml
[root@Ark-PXEBootServer ~]# rpm -ivh /var/ftp/pub/Packages/createrepo-0.9.9-23.el7.noarch.rpm
[root@Ark-PXEBootServer ~]# createrepo -vg /var/ftp/pub/comps-Server.x86_64.xml /var/ftp/pub/
[root@Ark-PXEBootServer ~]# yum grouplist
Step 3: Install and configure httpd / Apache / Web server
Install required packages and point the copied packages to web server default location. Permit SeLinux.
[root@Ark-PXEBootServer ~]# yum install httpd system-config-kickstart -y
[root@Ark-PXEBootServer ~]# ln -s /var/ftp/pub/ /var/www/html/
[root@Ark-PXEBootServer ~]# systemctl restart vsftpd.service
[root@Ark-PXEBootServer ~]# systemctl status vsftpd.service
[root@Ark-PXEBootServer ~]# systemctl enable vsftpd.service
[root@Ark-PXEBootServer ~]# systemctl restart httpd.service
[root@Ark-PXEBootServer ~]# systemctl status httpd.service
[root@Ark-PXEBootServer ~]# systemctl enable httpd.service

[root@Ark-PXEBootServer ~]# restorecon -Rvf /var/www/html/
[root@Ark-PXEBootServer ~]# restorecon -Rvf /var/ftp/pub/

[root@Ark-PXEBootServer ~]# systemctl restart vsftpd.service
[root@Ark-PXEBootServer ~]# systemctl restart httpd.service
Step 4: Generate unattended configuration file
To generate un-attended configuration file we have to use kickstart config tool
Required GUI to launch this tool
Login to your server using GUI support and run below command
[root@Ark-PXEBootServer ~]# system-config-kickstart
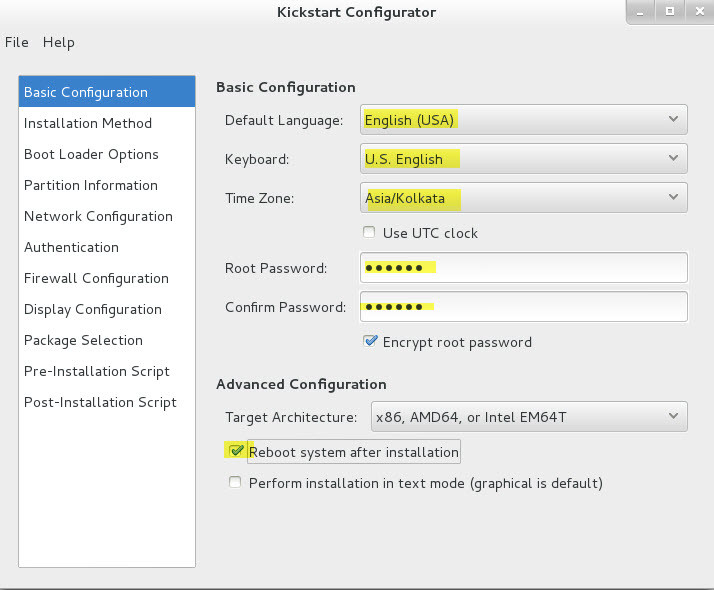
as shown in above screen select system language, keyboard language and root password
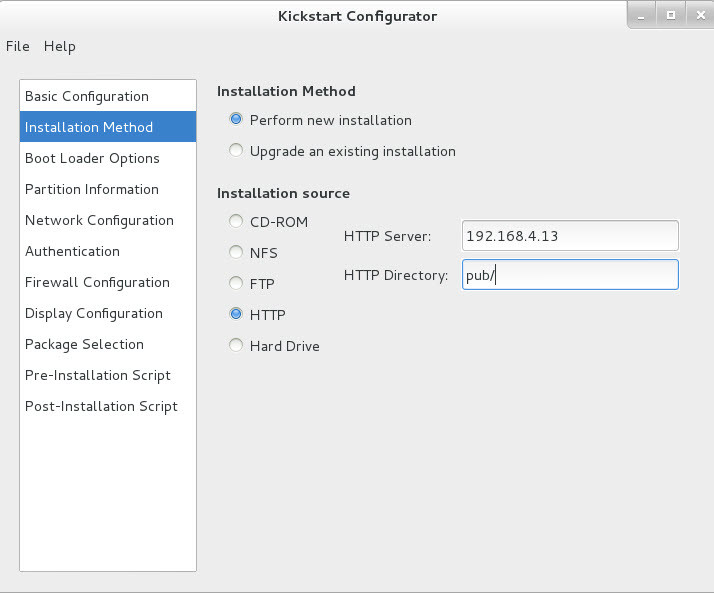
provide IP address and location of your DVD content path
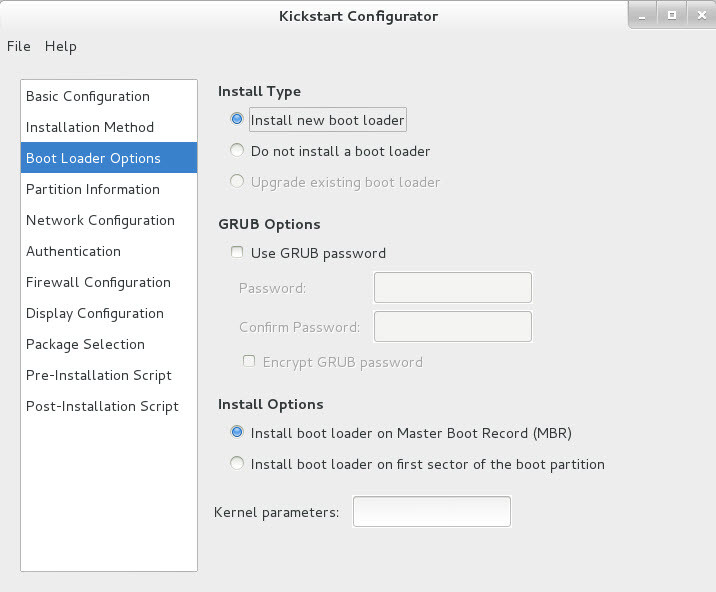
Select install new boot loader
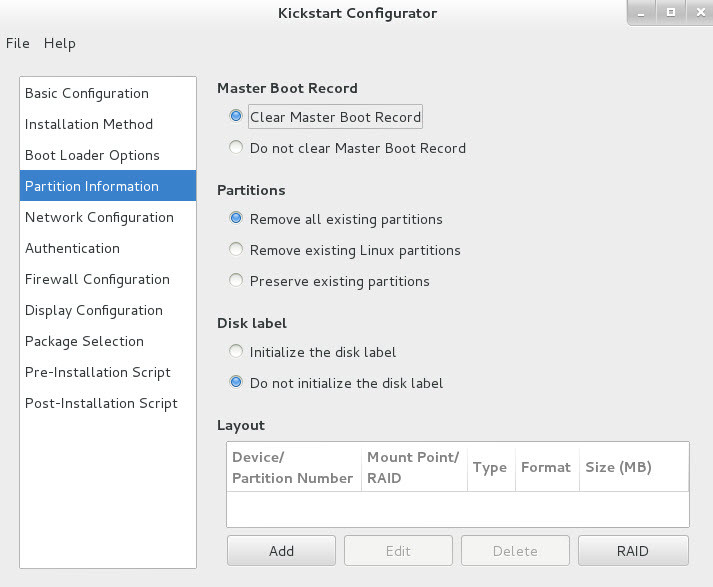
Select Clear Master boot Record and Click on Add
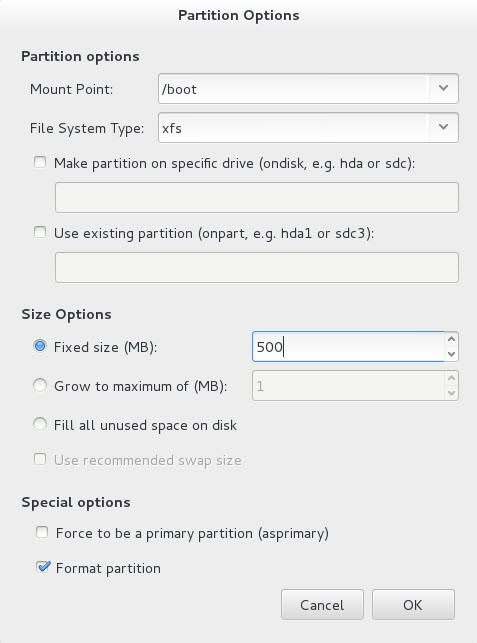
Add paritions ” /, /boot and swap” by repeating Add button
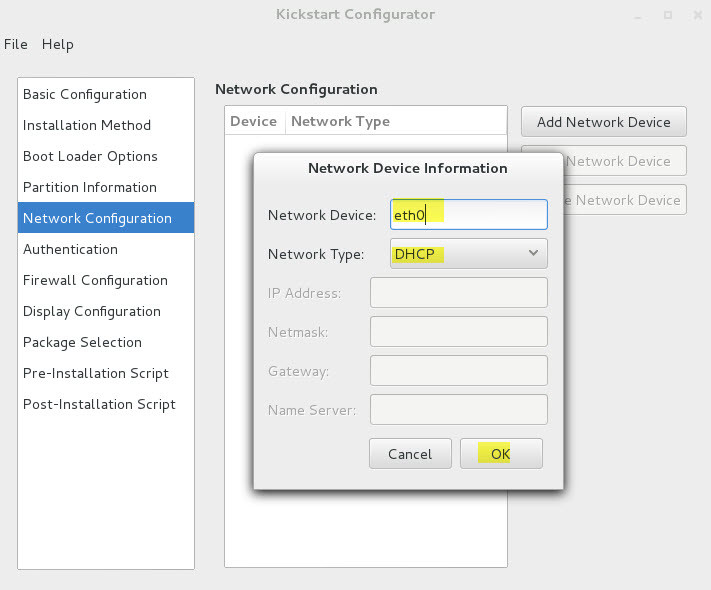
Click on Add Network Device and provide Network device name and Type

Authentication tab no need select anything leave it as it is
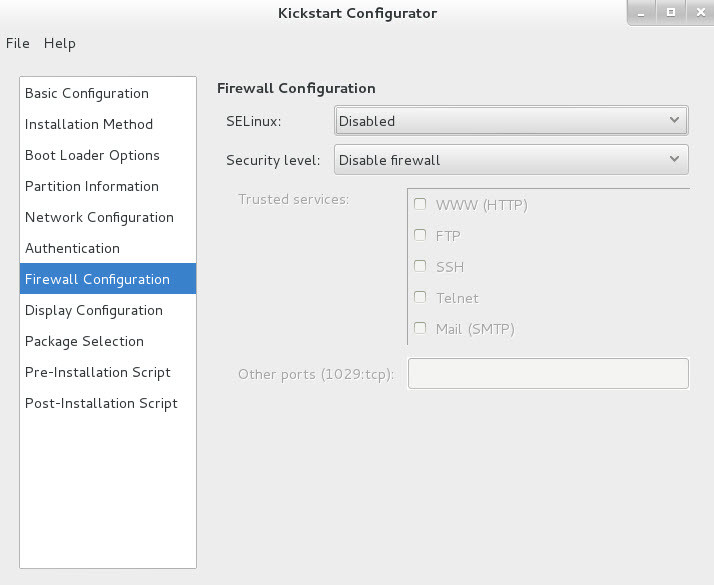
Select the option if you want enable Firewall configuration after the client installation

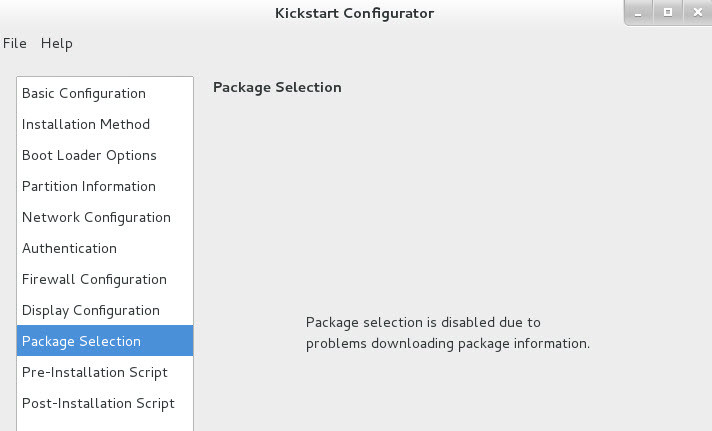
in this GUI tool there is no option to include packages, we have to add them by manually
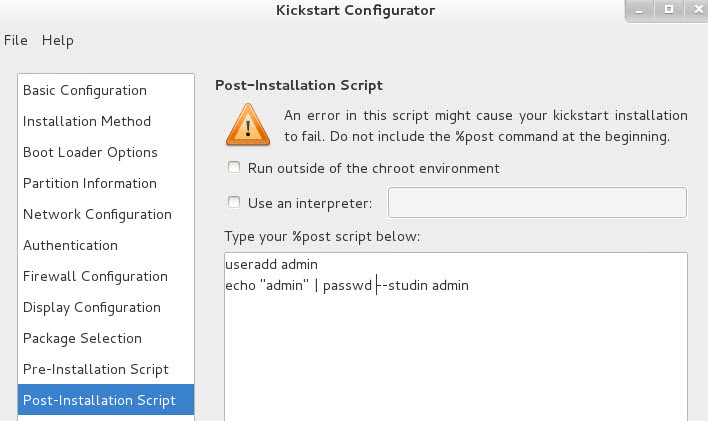
in Post installation Script if you want to execute any script after the installation you can include them
Save the file to /var/ftp/pub/ location
Now edit the configuration file and add packages list to that config file
we can make use of anaconda-ks.cfg file add blod characters to your /var/ftp/pub/auto.cfg file
[root@ldapclient1 pub]# vim /var/ftp/pub/auto.cfg

#platform=x86, AMD64, or Intel EM64T
#version=DEVEL
# Install OS instead of upgrade
install
# Keyboard layouts
keyboard 'us'# Reboot after installation
reboot
# Root password
rootpw --iscrypted $1$AWgTZ0t6$q/EdV2HgySO.sNxekJdEb.
# System timezone
timezone Asia/Kolkata
# Use network installation
url --url="http://192.168.4.13/pub"
# System language
lang en_US
# Firewall configuration
firewall --disabled
# Network information
network --bootproto=dhcp --device=eth0
# System authorization information
auth --useshadow --passalgo=sha512
# Use graphical install
graphical
firstboot --disable
# SELinux configuration
selinux --enforcing

# System bootloader configuration
bootloader --location=mbr
# Clear the Master Boot Record
zerombr
# Partition clearing information
clearpart --all
# Disk partitioning information
part /boot --fstype="xfs" --size=200
part / --fstype="xfs" --size=10000
part swap --fstype="swap" --size=2000

%packages
@base
@compat-libraries
@core
@desktop-debugging
@dial-up
@fonts
@gnome-desktop
@guest-agents
@guest-desktop-agents
@input-methods
@internet-browser
@multimedia
@print-client
@x11
chrony
kexec-tools
kexec-tools

%end

%post
useradd ravi
echo "ravi" |passwd --studin redhat
%end
Step 5: Install and configure tftp Server and DHCP server
Xinetd listens for incoming requests over a network and launches the appropriate service for that request
DHCP – Dynamic Host Configuration Protocol – to assign automatic IP address to PXE Boot client
Trivial File Transfer Protocol (TFTP) is a simple, lockstep, File Transfer Protocol which allows a client to get from or put a file onto a remote host. One of its primary uses is in the early stages of nodes booting from a local area network. TFTP has been used for this application because it is very simple to implement
[root@Ark-PXEBootServer ~]# yum install syslinux xinetd tftp-server dhcp -y
[root@Ark-PXEBootServer ~]# mkdir /var/lib/tftpboot/pxelinux.cfg
[root@Ark-PXEBootServer ~]# cp /usr/share/syslinux/pxelinux.0 /var/lib/tftpboot/
Enable TFTP service to run under the xinetd service
[root@Ark-PXEBootServer ~]# vim /etc/xinetd.d/tftp
[root@Ark-PXEBootServer ~]# cat /etc/xinetd.d/tftp
# default: off
# description: The tftp server serves files using the trivial file transfer \
# protocol. The tftp protocol is often used to boot diskless \
# workstations, download configuration files to network-aware printers, \
# and to start the installation process for some operating systems.
service tftp
{
 socket_type = dgram
 protocol = udp
 wait = yes
 user = root
 server = /usr/sbin/in.tftpd
 server_args = -s /var/lib/tftpboot
 disable = no
 per_source = 11
 cps = 100 2
 flags = IPv4
}

[root@Ark-PXEBootServer ~]# systemctl restart xinetd.service
[root@Ark-PXEBootServer ~]# systemctl enable xinetd.service
Configure the DHCP server, below mentioned configuration we have to modify in dhcp configuration file. (block and Bold characters)
[root@Ark-PXEBootServer ~]# cp /usr/share/doc/dhcp-4.2.5/dhcpd.conf.example /etc/dhcp/dhcpd.conf
cp: overwrite ‘/etc/dhcp/dhcpd.conf’? y

[root@Ark-PXEBootServer ~]# vim /etc/dhcp/dhcpd.conf
################################ DHCP SERVER CONFIG START ############################
# dhcpd.conf
#
# Sample configuration file for ISC dhcpd
#
Allow booting;
Allow bootp;
authoritative;
# option definitions common to all supported networks...
option domain-name "example.org";
option domain-name-servers ns1.example.org, ns2.example.org;
default-lease-time 600;
max-lease-time 7200;

# Use this to enble / disable dynamic dns updates globally.
#ddns-update-style none;
# If this DHCP server is the official DHCP server for the local
# network, the authoritative directive should be uncommented.
#authoritative;
# Use this to send dhcp log messages to a different log file (you also
# have to hack syslog.conf to complete the redirection).
log-facility local7;
# No service will be given on this subnet, but declaring it helps the
# DHCP server to understand the network topology.
subnet 10.152.187.0 netmask 255.255.255.0 {
}
# This is a very basic subnet declaration.
subnet 192.168.4.0 netmask 255.255.255.0 {
 range 192.168.4.1 192.168.4.50;
 option routers 192.168.4.13;
 default-lease-time 21600;
 max-lease-time 43200;
}
# This declaration allows BOOTP clients to get dynamic addresses,
# which we don't really recommend.
subnet 192.168.4.0 netmask 255.255.255.0 {
 range dynamic-bootp 192.168.4.101 192.168.4.200;
 option broadcast-address 192.168.4.255;
 option routers 192.168.4.13;
 option domain-name "arkit.co.in";
 option domain-name-servers 192.168.4.12;
 default-lease-time 21600;
 max-lease-time 43200;
 filename "pxelinux.0";
 next-server 192.168.4.13;
}
###################### DHCP SERVER CONFIG FILE ############################
Verify the dhcp configuration and restart the service
[root@Ark-PXEBootServer ~]# dhcpd configtest
[root@Ark-PXEBootServer ~]# systemctl restart dhcpd.service
[root@Ark-PXEBootServer ~]# systemctl status dhcpd.service
Step 6: Configure boot menu and image for remote PXE Boot client
Configure and design the boot menu, this menu is visible yet the client side
[root@Ark-PXEBootServer ~]# cd /var/ftp/pub/images/pxeboot/
[root@Ark-PXEBootServer pxeboot]# cp initrd.img vmlinuz /var/lib/tftpboot/
[root@Ark-PXEBootServer pxeboot]# cp /usr/share/syslinux/menu.c32 /var/lib/tftpboot/
[root@Ark-PXEBootServer isolinux]# cd /var/ftp/pub/isolinux/
[root@Ark-PXEBootServer isolinux]# cp -rvf * /var/lib/tftpboot/
[root@Ark-PXEBootServer isolinux]# vim /var/lib/tftpboot/pxelinux.cfg/default
[root@Ark-PXEBootServer isolinux]# cat /var/lib/tftpboot/pxelinux.cfg/default
default vesamenu.c32
timeout 600
display boot.msg

menu background splash.jpg
menu title Welcome to the RHEL 7 PXE Installation!
label local

menu label boot from ^local drive
menu default
localboot 0xffff

label ws
menu label Unattend Installation of RHEL7
kernel vmlinuz
append biosdevname=0 ksdevice=link load_ramdisk=1 initrd=initrd.img network ks=http://192.168.4.13/pub/auto.cfg noipv6

label si
menu label RHEL 7 ^Standard Installation
kernel vmlinuz
append biosdevname=0 ksdevice=link load_ramdisk=1 initrd=initrd.img

[root@Ark-PXEBootServer isolinux]# systemctl restart xinetd
[root@Ark-PXEBootServer isolinux] systemctl status xinetd
Step 7: Enable firewall ports
Enable ftp, dhcp, http, nfs and 4011 port from firewall
[root@ldapclient1 ~]# firewall-cmd --permanent --add-service=ftp
success
[root@ldapclient1 ~]# firewall-cmd --permanent --add-service=tftp
success
[root@ldapclient1 ~]$ firewall-cmd --permanent --add-service=dhcp
success
[root@ldapclient1 ~]# firewall-cmd --permanent --add-service=nfs
success
[root@ldapclient1 ~]$ firewall-cmd --permanent --add-port=4011/tcp
success
[root@ldapclient1 ~]# firewall-cmd --reload
success
That’s it. PXE Boot server is configured successfully
Go to Client and and boot the client using PXE

Client is getting the IP address from DHCP server
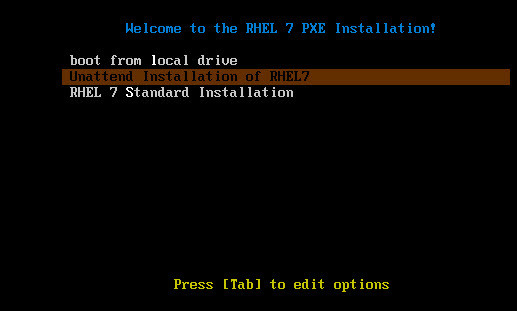
Boot menu. Select the appropriate option and hit enter
Please write your valuable feedback

Related Articles
Centos Operating system Topics
DNS Server RHEL 7 Step by Step Guide
Thanks for your wonderful Support and Encouragement