Install MariaDB 10.2 RHEL 7 / Centos 7 Complete Beginners Guide
We are going to see how to install MariaDB 10.2 RHEL 7 / Centos 7 Complete Beginners Guide. Why i said Beginners guide because this is a first step installation. Why we have to use MariaDB.
Few Features of Maria DB
- Maria DB is an open-source relational database software.
- It is a great alternative or drop-in replacement for MySQL.
- It is free and easy to use.
- MariaDB is fast, Salable and robust, with a rich ecosystem of storage engines
- MariaDB New features include GIS and JSON support
- A non-blocking client API library
- The Aria and XtraDB storage engines with enhanced performance
- Better server status variables, and enhanced replication.
- API and ABI compatibility with MySQL
Server Profile:
- Packages: MariaDB,MariaDB-server,MariaDB-libs
- Daemon Name: MariaDB
- Port Number: 3306
- Configuration file path: /etc/my.cnf
Install MariaDB 10.2 RHEL 7 / Centos7
Let’s install maria DB packages using the local repository, along with installation media maria DB packages also included. So not required to add external repo packages for maria DB installation. If you want the latest version then use yum repo from maria DB
MariaDB Repo for RHEL 7 64bit
[mariadb]
name = MariaDB
baseurl = http://yum.mariadb.org/10.2/rhel7-amd64
gpgkey=https://yum.mariadb.org/RPM-GPG-KEY-MariaDB
gpgcheck=1
MariaDB repo for Centos 7 64bit
[mariadb]
name = MariaDB
baseurl = http://yum.mariadb.org/10.2/centos7-amd64
gpgkey=https://yum.mariadb.org/RPM-GPG-KEY-MariaDB
gpgcheck=1
Note: We have to enable yum group option to install mariaDB packages
[root@TechTutorials ~]# yum groupinstall mariadb*
Installed:
MySQL-python.x86_64 0:1.2.3-11.el7                mariadb.x86_64 1:5.5.41-2.el7_0         mariadb-server.x86_64 1:5.5.41-2.el7_0
mysql-connector-odbc.x86_64 0:5.2.5-6.el7

Dependency Installed:
perl-Compress-Raw-Bzip2.x86_64 0:2.061-3.el7     perl-Compress-Raw-Zlib.x86_64 1:2.061-4.el7     perl-DBD-MySQL.x86_64 0:4.023-5.el7
perl-DBI.x86_64 0:1.627-4.el7                    perl-Data-Dumper.x86_64 0:2.145-3.el7           perl-IO-Compress.noarch 0:2.061-2.el7
perl-Net-Daemon.noarch 0:0.48-5.el7              perl-PlRPC.noarch 0:0.2020-14.el7               unixODBC.x86_64 0:2.3.1-10.el7

Complete!
Enable and Start Maria DB Service
After Completion of MariaDB package installation, we have to enable, Start the service and verify whether itis listing on port number and status
[root@server ~]# systemctl enable mariadb.service
ln -s '/usr/lib/systemd/system/mariadb.service' '/etc/systemd/system/multi-user.target.wants/mariadb.service'

[root@server ~]# systemctl start mariadb.service

[root@server ~]# ss -tunlp |grep mysqld
tcp    LISTEN     0      50                     *:3306                  *:*      users:(("mysqld",4188,13))

[root@server ~]# systemctl status mariadb.service
Allow MariaDB port from the firewall to communicate from clients
[root@server ~]# firewall-cmd --permanent --add-service=mysql
success
[root@server ~]# firewall-cmd --reload
success
How you would like to configure the MariaDB instance, Networking without Networking.
Networking = Enable instance networking so that we can connect to instance from remote machine
Without Networking = We can’t connect instance from the remote machine just we can use within the server
[root@server ~]# vim /etc/my.cnf
skip-networking=1

:wq
Now restart maria.DB service to reflect the changes
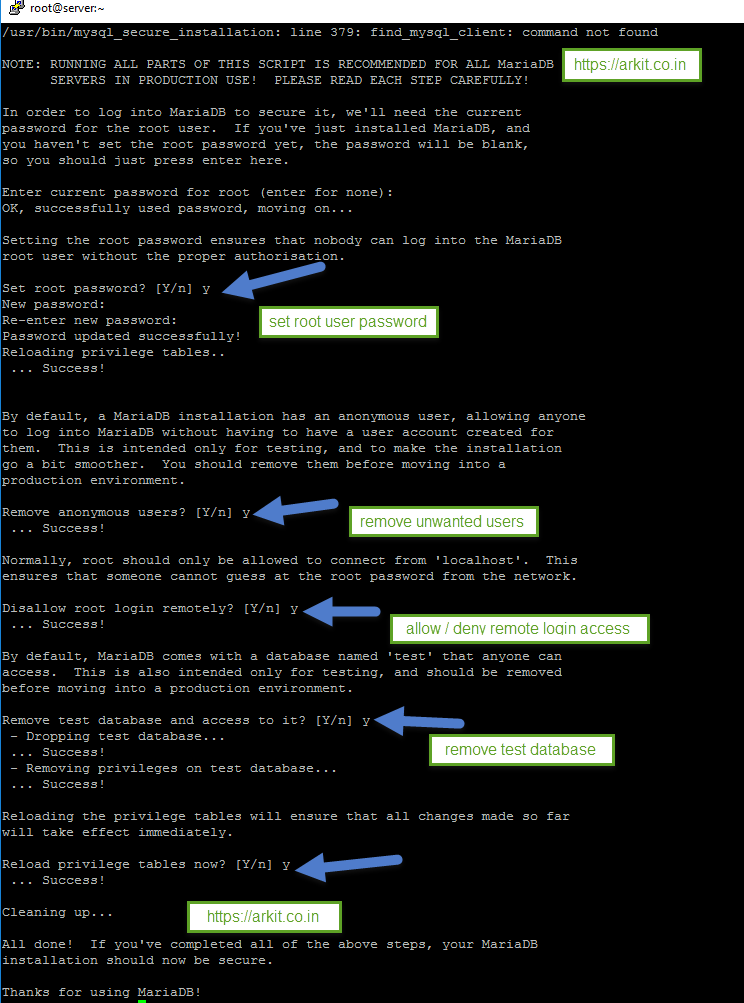
Now to secure MariaDB, we have to set root user password for MariaDB, remove an anonymous user, disallow login remotely, remove the test database and etc.
installing the MariaDB server using below command. Hardening MariaDB.
[root@server ~]# mysql_secure_installation

Enter current password for root (enter for none):
OK, successfully used password, moving on...
Set root password? [Y/n] y
New password:
Re-enter new password:
Password updated successfully!
Reloading privilege tables..
... Success!

Remove anonymous users? [Y/n] y
... Success!

Disallow root login remotely? [Y/n] y
... Success!


Remove test database and access to it? [Y/n] y
- Dropping test database...
... Success!
- Removing privileges on test database...
... Success!

Reload privilege tables now? [Y/n] y
... Success!

Cleaning up...

All done!  If you've completed all of the above steps, your MariaDB
installation should now be secure.

Thanks for using MariaDB!
Hardening MariaDB Database by creating a password
After installation of MariaDB server, database root user password is blank. So for security to reset the root password.
Note: Without database root password we can able to login
Now connect to Maria DB server with root password first time
[root@server ~]# mysql -u root -p
Enter password:
MariaDB [(none)]>
That’s it about Install MariaDB 10.2 in RHEL 7 / Centos 7 Complete Beginners Guide.
Conclusion
Install of MariaDB 10.2 RHEL 7 / Centos 7 is completed. MariaDB is the replacement of Mysql in a newer version like RHEL 6 / RHEL 7 / Centos 7.
Please do comment your feedback. Stay tuned for upcoming article Database creation, Creating Tables, user creation, granting privileges, Inserting, Updating and deleting records.
Thanks for your wonderful Support and Encouragement